
Lightroom Tools Every Photographer Should Be Using
- Cienna So
- Mar 28, 2024
- 5 min read
Updated: Feb 15
Introduction
Lightroom can feel overwhelming at first, but it doesn’t have to be. Instead of getting lost in all the options, let’s focus on the tools that actually matter—the ones that will make your editing process smoother and more efficient.
If you're looking for a complete breakdown of every Lightroom setting, check out this full breakdown: How All The Lightroom Settings Work
Otherwise, let’s dive into the Lightroom tools every photographer should be using to enhance their edits with ease!

The Point Color Tool – Precise Color Control
One of the most powerful ways to fine-tune colors in Lightroom is with the Point Color Tool, found in the Color Mixer panel. Instead of making broad adjustments to an entire color range, this tool lets you target specific colors in your image and tweak them with precision.

Why You Need This Tool
Allows for ultra-specific color adjustments.
Helps enhance or tone down colors without affecting the entire image.
More control compared to the standard HSL sliders.
How to Use It
Want a step-by-step guide on how to use the Point Color Tool like a pro? Check out my in-depth tutorial: How to Use Point Color in Lightroom.
This tool is perfect for fixing color inconsistencies, making certain elements pop, or adjusting skin tones with precision.
The Tone Curve – The Key to Depth and Contrast
If you’re only using the basic Exposure, Contrast, and Shadows sliders, you’re missing out! The Tone Curve is where you can add depth, refine contrast, and create a polished, professional look without over-editing.
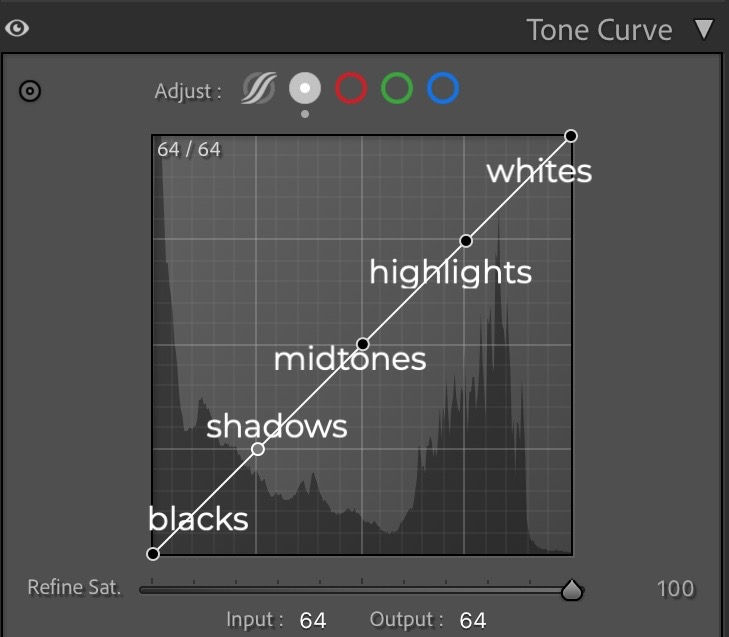
Why You Should Be Using It
Gives more precise control over brightness and contrast.
Helps fine-tune highlights, mid-tones, and shadows separately.
Essential for achieving a moody, bright & airy, or cinematic style.
Learn How to Use It
Want a step-by-step guide on making the most of the Tone Curve? Check out my full tutorial: How to Use Tone Curve in Lightroom to Enhance Your Photos.
This tool is a game-changer for adding depth and works especially well alongside presets to fine-tune the final look.
The Region Tool – Quick & Easy Exposure Fixes
The Region Tool, located in the Tone Curve panel, is one of Lightroom’s most underrated features. It allows you to make targeted adjustments to different tonal ranges in your image—without the complexity of manually tweaking the curve.

Why You Should Be Using It
Lets you adjust shadows, mid-tones, highlights, and blacks separately.
Ideal for fixing exposure issues and adding depth with just a few clicks.
A simple way to refine contrast without overcomplicating your edits.
How to Use It
Open the Tone Curve panel in the Develop module.
Below the curve, find the Region sliders for Highlights, Lights, Darks, and Shadows.
Adjust:
Shadows & Darks to bring out detail in darker areas.
Lights & Highlights to control brightness without losing detail.
Make small tweaks—subtle adjustments can make a big impact!
The Region Tool is a fast way to fine-tune your image without making extreme edits. It works great in combination with the Tone Curve for ultimate control over contrast and exposure.

The Radial & Linear Gradients – Selective Adjustments Made Easy
Sometimes, you don’t want to edit your entire image—you just need to brighten a subject, add depth to the background, or enhance specific areas. That’s where Radial and Linear Gradients come in! These tools let you apply targeted adjustments for a more balanced and professional-looking edit.
Why You Should Be Using Them
Perfect for enhancing subjects without affecting the whole image.
Great for fixing uneven lighting or adding subtle vignettes.
Allows precise control over exposure, contrast, and color in selected areas.
How to Use Them
Select either the Radial Gradient (for circular adjustments) or Linear Gradient (for straight-line effects).
Drag the gradient over the area you want to adjust.
Use sliders to tweak exposure, contrast, color, or sharpness within the selected area.
Refine with the Feather setting to make the transition smoother.
These tools are game changers for naturally drawing attention to your subject or balancing out highlights and shadows in landscapes.
The Adjustment Brush – Precision Editing at Your Fingertips
For the ultimate control over small details in your image, the Adjustment Brush is your best friend. Unlike gradients, which apply adjustments in a set shape, the Adjustment Brush lets you paint over specific areas for precise edits.
Why You Should Be Using It
Perfect for brightening eyes, enhancing details, or fixing shadows.
Allows selective adjustments to exposure, contrast, sharpness, and color.
Essential for fine-tuning skin tones or removing unwanted color casts.
How to Use It
Select the Adjustment Brush in the Develop module.
Paint over the area you want to adjust.
Use the sliders to tweak exposure, contrast, clarity, sharpness, or color.
Adjust the Feather setting for a softer transition.
Use Auto Mask to keep adjustments within defined edges.
The Adjustment Brush is one of Lightroom’s most powerful tools, letting you apply precise refinements without affecting the rest of the image.
The Calibration Panel – Unlock True-to-Life Colors
At the very bottom of the Develop module, you’ll find the Calibration Panel—an often-overlooked tool that can make a huge difference in your edits. It allows you to fine-tune how Lightroom interprets colors, helping you achieve more natural skin tones, richer hues, and a more polished final edit.
Why You Should Be Using It
Helps fix color casts and makes colors look more true-to-life.
Fine-tunes how Lightroom processes colors from your camera.
Perfect for making presets work consistently across different lighting conditions.
How to Use It
Scroll to the Calibration Panel in the Develop module.
Adjust the Red, Green, and Blue Primary sliders to shift color tones subtly.
Keep changes minimal—small tweaks make a big difference.
Use the Saturation slider to further refine color depth.
This tool is especially useful if you edit a lot of portraits, as it helps balance skin tones and prevent unnatural color shifts.
More Lightroom Tools to Explore
Lightroom is packed with powerful features beyond the must-have tools we’ve covered. Here are a few more that can take your edits to the next level:

Other Tools You Should Know
Healing Brush – Easily remove blemishes, distractions, or unwanted objects.
Color Grading Panel – Fine-tune shadows, mid-tones, and highlights for a unique color style.
Lens Corrections – Fix distortion and vignetting caused by your lens.
Transform Panel – Straighten lines and correct perspective issues in architectural shots.
These tools might not be part of your everyday workflow, but knowing when to use them can save time and improve your final edit.
Enhance Your Edits with Jaide & Jett Presets
Editing doesn’t have to be time-consuming! If you want to speed up your workflow while maintaining a professional look, Jaide & Jett Presets are here to help. These presets are designed to work across different lighting conditions, giving you consistent, beautiful edits with just a few clicks.


Why You'll Love These Presets
Designed to work on a variety of lighting and camera settings.
Helps create a cohesive, polished look across all your photos.
Saves time by applying one-click adjustments that you can fine-tune to your liking.
Want to see them in action? Explore the full preset collection here!
Join the Community
Photography is more fun when you’re learning and growing with others! If you’re looking for a space to connect with like-minded photographers, get editing tips, and share your work.
Why You Should Join
Get exclusive Lightroom tips and tutorials.
Ask questions and get feedback from fellow photographers.
Be part of a supportive and creative community.
Ready to connect? Join the Facebook group here!
Final Thoughts
Lightroom is packed with powerful tools, but knowing which ones to use can make all the difference. By incorporating these essential features into your workflow, you’ll be able to edit faster, refine colors more accurately, and create stunning images with ease.
Quick Recap of Must-Use Tools:
✅ Point Color Tool – Precise color adjustments for targeted edits.
✅ Tone Curve & Region Tool – Control contrast and depth with accuracy.
✅ Radial & Linear Gradients – Perfect for selective adjustments.
✅ Adjustment Brush – Fine-tune exposure, sharpness, and color in specific areas.
✅ Calibration Panel – Adjust how Lightroom processes color for a polished look.
If you’re ready to take your editing to the next level, check out my Lightroom guides, presets, and free resources to keep improving your skills!


Thank you! Will try point color out soon.